Blogroll

Showing posts with label Sweets And Desserts. Show all posts

Sweet Corn Halwa, Makai Ka Halwa


          Wishing all my fellow bloggers and friends a Very Happy Diwali, many of us would be busy with last minute sweet preparations and decorations, for those who love fireworks, have a Safe Diwali. Today's post is going to be another easy sweet dish, Sweet Corn Halwa. I never thought that we could make sweet dish with sweet corn, until I saw this halwa here. I have made vadas with it, long time back, but usually I boil it or grill it. After doing the sundal with sweet corn, I had one more lying in the refrigerator, and I wanted to try something new with it or something new that I have not made with sweet corn. Most of the corn halwas that I found on the net used mawa or fresh khoya in it, I didn't have either and I was a little lazy to go out and get it. Then I found this one which used just milk, the method was almost similar to the one used for making Lauki ( Bottle Gourd ) Halwa. The recipe as such is very simple, the only thing that takes time and patience, is sauteing the corn well, otherwise the halwa will have the raw smell of corn. If you like the other halwas made with vegetables like lauki, carrot and beetroot, then give this a shot..

Need To Have

  • Sweet Corn - 1
  • Milk - 1/2 cup
  • Sugar - 6 to 7 tablespoons
  • Cardamom - 2 to 3
  • Saffron - a big pinch
  • Ghee - 2 tablespoon
  • Pistachios - 6 - 7, chopped

Method


          Remove the kernels from the corn and grind it into a smooth paste, it came to about 3/4 cup.


          Melt the ghee, add the ground corn and keep sauteing it on medium/low heat for about 15 minutes till the raw smell of corn goes away and it starts leaving out the ghee.


          Now add the milk and 1/2 cup of water and cook for another 10 minutes. Then add the sugar and mix, keep mixing for another 5 minutes or so, till all the moisture is gone and again the halwa starts leaving out the ghee. At this stage, switch off the stove and add the cardamom powder ( take the inner pods and powder ), saffron threads and mix, garnish with the chopped pistachios and serve it hot or warm.


Note
It's very important to saute the corn well, otherwise the halwa will have the raw corn smell.
Add the cardamom at the very end, this takes away the smell of corn.

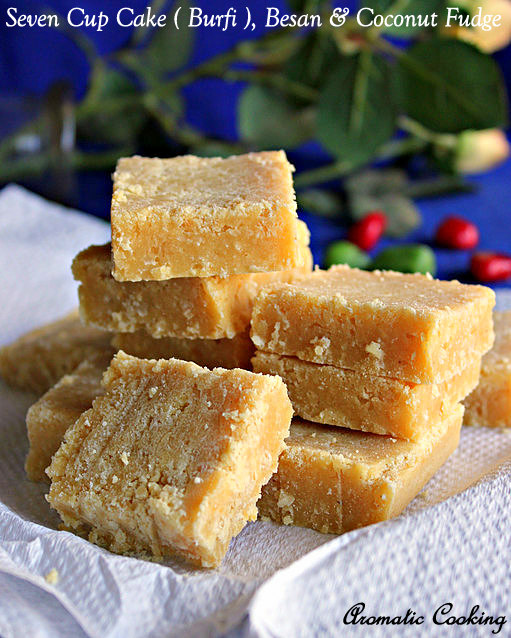
Seven Cup Cake ( Burfi ), Besan And Coconut Fudge


          Seven Cup Cake ( Burfi ), is an easy sweet but somehow I have never tried to do it till now. It's basically a combination of the mysore pak ( besan fudge ) and the coconut burfi. The name seven cup denotes the total cups of all the ingredients used, 1 cup besan flour, 1 cup coconut, 1 cup milk, 3 cups sugar and 1 cup ghee. I found the sugar was a little too much, so I made small changes in the quantity. The burfi came out really good and it tasted very delicious..

Need To Have

  • Besan Flour/ Kadala Maavu/Gram Flour - 1 + 1/2 cup
  • Grated Coconut - 1 cup
  • Milk - 1 cup
  • Sugar - 2 + 1/4 cups
  • Ghee - 1 cup

Method


          Grease a tray with ghee and keep. Heat a teaspoon of ghee and roast the besan flour for about 3 to 5 minutes, till you get a nice smell, but make sure the color doesn't change. Switch off the stove, add the coconut, milk, sugar and half the ghee.


          Mix it really well and make sure there are no lumps. Now put it back on the stove, keep stirring on medium heat.  The mixture would become thicker, add the remaining ghee and keep mixing. At one point, you'll see that the mixture has thickened so much and it's becoming a little difficult to turn the mixture. You'll also see the edges drying up, and the sugar forming white pieces. Immediately pour it in the greased tray, tap the tray or spread it out with a greased spatula.


          After spreading it out, using a butter paper or parchment paper, smooth out the top and let it cool for 10 minutes. When it's still warm, cut it out into square pieces, but don't remove them yet. Let it cool completely, then remove it carefully and store it.


Note
Roast the gram flour well, otherwise the sweet will have the raw besan smell.
The ingredients came to only 6 3/4 cups, I reduced the sugar by 3/4 cups and increased the besan by 1/2 cup, if you want, you can increase the coconut by another 1/4 cup, that way you'll end up with total 7 cups.
The final consistency is very  important, if you let it cook further, then you'll not be able to spread and might end up with very hard burfis.
Look out for the sugar forming the white stuff, and when it starts drying out in the edges as we keep mixing.
The above quantity will give ou about 30 to 40 burfis, depending on the size of the tray.

Dates And Nuts Roll, Khajoor Katri


          Another easy and delicious recipe for this Diwali, Dates And Nuts Roll or Khajoor Katri. This has been on my do list for a long time, it's a healthy and delicious sweet. It's a ' no sugar ' sweet, the dates give all the sweetness for these rolls. It's a fool proof recipe, anyone can do it and it just takes less than 30 minutes, what more can you ask for, try it out for this Diwali and enjoy..

Need To Have

  • Soft Variety Dates - 12 big ones
  • Pistachios - 1 tablespoon
  • Cashews - 6
  • Almonds - 8
  • Walnuts - 1 tablespoon
  • Poppy Seeds - 1 teaspoon
  • Ghee - 1 teaspoon
  • Green Cardamoms - 2 small ones
  • Nutmeg Powder - 1 small pinch

Method


          Remove the seeds from the dates, chop it and then grind it into a coarse paste.


          Chop the nuts into small pieces and keep.


          Heat half a teaspoon of the ghee and roast the nuts for 2 to 3 minutes, remove and keep. Heat the remaining 1/2 teaspoon of ghee, add the poppy seeds and toast for a minute.


          Then add the ground dates, mix it well till the poppy seeds is blended well with the dates. Then
add the nuts, cardamom ( take the inner pods and powder ) and the nutmeg powder and mix everything well and remove.


           Let it cool a little, then roll it into a log, roll it in aluminium foil and leave it in the refrigerator for an hour or two. Then remove it, slice it and serve.


Note
Use good quality, soft dates and good quality nuts.
If making large quantity, then use a food processor to chop the nuts.
A non stick pan is good for this, and do everything on low heat,

Kaju Katli, Cashew Burfi


          Kaju Katli is one of my favorite sweets, of course, having a big sweet tooth, I end up saying this for most of the sweets. On the other hand, my daughter doesn't like it at all, so I hardly make it or buy it. This time also, I made a small batch, using just 1/2 cup of cashews. This is a simple sweet, you have to follow a few steps carefully and I am sure anybody can make it. And even if you didn't get them perfect the first time, you can still eat it, since the taste is not the problem, only getting the smooth and soft texture is the tricky part. If you are a beginner, then this could be an easy sweet to try out for this Diwali..

Need To Have

  • Broken Cashews - 1/2 cup
  • Sugar - 1/4 cup
  • Ghee for greasing

Method


          Powder the cashews in a blender, I used the small jar of my mixie, the powder will be a little coarse. I used 1/2 cup broken cashews and I got a heaped 1/2 cup of cashew powder.


          Take the sugar and 2 tablespoons of water and heat it, mix till the sugar dissolves, then add the cashew powder.


          Keep mixing on medium/low heat, till it all comes together, but it shouldn't start drying out.


          Just when it starts to come together, remove it on a plate. Leave it to cool a little, but not cold, just enough, so that you can handle it. Apply some ghee in your hand or on the cashew mixture and knead it softly, till you get a smooth dough.


          Then place it between butter paper or parchment paper and roll it out smoothly, you can roll out as thin or as thick as you want. Then slice them into diamond or square shapes, remove them and store them in a dry airtight container.


Note
While grinding the cashews, use the pulse button, and keep scraping the sides of the jar, once you get the coarse powder, stop and don't grind any further, if it becomes pasty and sticky, then you have gone wrong in the first step itself.
If you keep your cashews in the freezer, then bring it to room temperature and also make sure that your mixie/blender is completely dry.
If the cashew mixture turns a little dry or crumbly, sprinkle some milk and knead, but then the shelf life reduces and you have to keep it in the refrigerator.
Since this sweet uses just cashews and sugar only, make sure you use good quality cashews.
The katlis might appear to be a little too soft, as soon as you cut them, but they dry out as they cool completely.

Baklava ( With Walnuts And Honey )


          Baklava, it's a rich and delicious dessert made with phyllo ( fillo ) pastry, which is layered with nuts and drizzled with sugar and honey syrup. I have tasted this a couple of times, but mostly store bought and I was not that much impressed by the taste. But, couple of years back, I tasted a homemade version of this delicious dessert, it was simply too good, the baked pastry was crispy and at the same time juicy from the syrup. I didn't get a chance to ask for the recipe and then I totally forgot about it. After that time, I have tasted some store bought versions, but nothing came close to that homemade version. I have never tried looking for it in Bangalore, but then, when I saw Phyllo Pastry in the freezer section of the grocery store, I just had to pick it up. I had a couple of dishes in my mind that I want to try with it, the topmost being this super delicious Baklava and I found the perfect recipe here. Working with phyllo pastry needs some patience, you have to be very gentle with it, it took me almost an hour to layer the sheets. I made it yesterday evening, I had to wait till today morning to taste it, the baklava has to soak in the syrup. I took the first bite, Hurrah!, it tasted just like the one that I had tasted so many years back, it was worth all the effort, time and wait..

Need To Have

  • Phyllo Pastry - 10 sheets
  • Coarsely Ground Walnuts - 1 cup
  • Unsalted Butter - 7 to 8 tablespoons
  • Cinnamon Powder - 1/4 teaspoon
  • Chopped Walnuts to Garnish

For The Syrup

  • Granulated Sugar - 1/2 cup
  • Honey - 1/4 cup
  • Lemon Juice - 1 tablespoon
  • Water - 1/4 cup + 2 tablespoons

Method


          Take the sugar, honey, lemon juice and water, heat it and bring it to a boil while mixing it for the sugar to dissolve. Once the sugar has dissolved, let it simmer on low heat for about 4 minutes, without stirring. Remove it and let it cool completely. Mix the coarsely ground walnuts and cinnamon powder and keep.


          Thaw the frozen phyllo pastry according to the directions given on the pack, mine said to thaw it at room temperature for 4 hours. I have used a 8.5 x 4.75 size pan, I used 10 sheets of pastry, I cut each sheet into 3 to roughly fit the baking pan, so totally I had 30 sheets, roll and immediately refrigerate the remaining sheets. Now grease the pan with melted butter, then layer it with pastry sheet, brush it with butter, then layer another sheet, keep repeating for 9 sheets.


          Spread 1/4 cup of the walnut mixture, then again start layering the sheets, only 4 this time, then spread another 1/4 cup of the walnut mixture, repeat another 4 sheets and 1/4 cup walnut mixture two more times, then layer with the remaining 9 sheets, don't forget to butter the sheets. So it goes like, 9 sheets, walnut mix, 4 sheets, walnut mix, 4 sheets, walnut mix, 4 sheets, walnut mix, last 9 sheets, so you have used up the 30 sheets of pastry. Brush the top with butter, then using a sharp knife, slice the pieces.


          Bake it at 165 C for about 1 hour 15 minutes to 1 hour 25 minutes, till the top turns golden in color. Remove it from the oven and evenly drizzle the sugar and honey syrup immediately. Let it cool for 6 to 8 hours or overnight, then serve it garnished with more walnuts.


Note
Be gentle with the pastry sheets, while layering a sheet, keep the others covered with a damp towel.
The pastry that I used was 97% fat free, so I didn't want to skimp on the butter, the fat is needed for the baking.
Slice the pieces really well, otherwise you'll not get neat pieces after baking.
The baklava layers should be crunchy when you bite into it and at the same time juicy from the sugar syrup but it should not be soggy, that's the perfect baklava.

Aval Ladoos, Poha ( Rice Flakes ) Ladoos With Jaggery


          Another easy and delicious sweet, Aval Ladoos, Poha ( Rice Flakes ) Ladoos. We can make these ladoos with regular white rice flakes and sugar but I have used red rice poha and jaggery and also a little bit of roasted gram dal/dalia in the ladoos, so it's a little more healthier. I just tried it out with just 1/2 cup of rice flakes, so it hardly took me 15 minutes to make them, actually this is such a simple dish, even beginners can make it easily. Though we use some ghee to shape the ladoos, it's still a very healthy snack for kids..

Need To Have

  • Red Rice Flakes/Sigappu Aval/Red Poha - 1/2 cup
  • Roasted Gram Dal/Pottukadalai/Dalia - 2 tablespoons
  • Jaggery Powder - 31/2 tablespoons
  • Cardamom - 1
  • Cashews - 4, broken into pieces
  • Golden Raisins - 10
  • Ghee - 5 teaspoons

Method


          Dry roast the rice flakes for about 5 minutes, remove and keep. In the same pan, roast the roasted gram dal, till it turns golden and remove.


          Once the rice flakes and roasted gram dal has cooled, grind them into a powder. Heat a teaspoon of ghee and roast the cashews and raisins till golden, remove and keep.


          To the powdered aval/poha, add the jaggery, cashews, raisins, cardamom ( take the inner pods and powder ) and the remaining 4 teaspoons of ghee, mix it and shape the ladoos.


Note
I got 6 ladoos from the above quantity.
We can add roasted peanut powder instead of the roasted gram powder.
If you want, you can use only 4 teaspoons of ghee, still you'll be able to shape the ladoos.
I have used organic powdered jaggery, make sure you use clean and good quality jaggery, because we are using the jaggery as such, no melting and straining the impurities.

Semiya Payasam, Vermicelli Kheer


          Semiya Payasam/Vermicelli Kheer, I have made it so many times, but somehow till today, I couldn't post it. This is one of the easiest payasams or should I say the easiest of all payasams. Now that, we get roasted vermicelli in the market, it has become even more easier to do this, the time taken for roasting it is also saved. I always have a couple of vermicelli packets in the pantry, it comes in handy when I have to make a quick dessert for unexpected guests..

Need To Have

  • Roasted Vermicelli - 1/4 cup
  • Sugar - 1/4 cup - 1 teaspoon
  • Milk - 3/4 cup
  • Cashews - 4, broken into pieces
  • Golden Raisins - 10
  • Ghee - 1 teaspoon
  • Cardamom/Elaichi - 1

Method


          Heat the ghee and roast the cashew and raisins till golden, remove and keep. To the ghee in the pan, add the vermicelli, mix it a couple of times and remove ( we are not roasting, just coating the vermicelli with the ghee in the pan ).


          Now take 1 cup of water and bring it to a boil, then add the vermicelli to it. Cover and cook till the vermicelli is cooked and soft.


          Once the vermicelli is cooked, add the sugar and mix it, then add the milk and simmer it on medium heat, till it thickens a little. Finally add the cardamom powder ( take the inner pods and powder ), roasted cashews and raisins, mix and remove.


Note
If roasted vermicelli is not available, then roast it in ghee till it turns golden.
You can use condensed milk ( in that case, reduce the sugar ) or evaporated milk, the payasam will be even richer.
The payasam/kheer becomes thick as it cools, so remove it from the stove when it still has some milk in it, or mix in some milk just before serving to bring it to the desired consistency.
The sugar that I have added is enough if you serve it as a thick payasam, but if you're serving it, like you can drink it, then you might need a little more sugar.
This payasam tastes best when it's a little warm or at room temperature.

Aate Ka Halwa ( Sheera ), Wheat Flour Halwa

         
          Happy Navratri, though I don't keep Golu in our house, I enjoy going to Golus, looking at the beautiful dolls, listening to the songs and last but not the least, the sundals and sweets. Of course I should not forget the Dandiya, everything is so colorful and beautiful and for their share, the Indian food blogs are also showcasing so many sundals and sweets. To keep up with that, I am posting this simple, yet delicious Aate Ka Halwa/Sheera. It's such a simple sweet, needs just four ingredients but it tastes so good..

Need To Have

  • Wheat Flour - 1/4 cup
  • Sugar - 1/4 cup
  • Ghee - 2 tabespoons
  • Almonds - 2

Original recipe here.

Method


          Roast the flour for about 5 to 7 mins, till it gets a pinkish tinge.


          Take the sugar and 1/4 cup water and heat till the sugar melts, remove and keep.


          Once the flour turns pink, add the ghee and mix for a minute. Remove from heat, add the sugar syrup, mix it well without lumps, then put it back on the stove, mix it for 3 to 5 minutes and remove. Slice the almonds and garnish the halwa with it and serve it warm or at room temperature.


Note
I just made a very small quantity, serves one or two people.
Since I have used a small quantity, the time taken for roasting the flour, melting the sugar and the final mixing was all very less.
The halwa tasted awesome, but the next time I would try using a little less ghee ( of course no complaints about the excess ghee ), but reducing it by a teaspoon should still be good.
You can add cardamom powder for flavor, but I like the roasted aate and ghee flavor better.

Rajgira ( Amaranth ) Ladoos

       
          Rajgira ( Amaranth ), I have been reading about this seed, so much on the web for so long, but only recently I bought a pack of this nutritious grain. Though you can read about its nutritional value on the web, let me give a brief information about it, since this is the first time I am posting something with it on my blog. It's gluten free, it's high in protein, magnesium, potassium, phosphorous, iron and has twice the calcium as milk. It's the only grain that has Vitamin C and has all the 9 amino acids needed by the body. It's good for the eyes and for you ladies ( men too ) out there, it's very good for the hair. This grain/seed is not used in the Tamil cuisine, at least as far as I know, but it's widely used in North Indian cooking, the seeds are popped and made into ladoos, chikkis or kheer and the rajgira/amaranth flour is used to make rotis and parathas. Since, I had bought the seeds, I thought I'll try out the ladoos, we can't make the ladoos with the raw seeds, they have to be popped first. Popping the seeds needs a little patience and time, once the seeds are popped ( you also get popped rajgira ), then the ladoos can be made in no time. To start with, I popped just 1/3 of a cup of these seeds and made the ladoos. They turned out really good, tasted nutty but very, very light when compared to sesame ladoos..

Need To Have

  • Rajgira Seeds/Amaranth - 1/3 cup
  • Chopped Cashews - 1 tablespoon
  • Raisins - 1 tablespoon
  • Ghee/Clarified Butter - 1 tablespoon
  • Jaggery - 1/2 cup

Original recipe here.

Method


          Heat a heavy bottomed pan, add the seeds a little at a time ( a couple of teaspoons ), you'll see it popping ( just like sesame seeds ). Immediately cover the pan with a lid, let the popping stop, then remove it immediately before it starts to brown. If you don't cover it with the lid, then the seeds are going to pop all over the place. Do the same with all the seeds and keep.


          Sieve the popped seeds ( using a fine sieve ) to remove the seeds that have not popped. Add the cashews and raisins to the popped rajgira.


          Heat the ghee, add the jaggery along with a tablespoon of water and let it to melt. then remove it when it starts bubbling up.


          Pour the jaggery syrup ( strain it, as shown in the picture ) over the seeds and give a quick mix with a spoon. Then while it's still hot ( of course, bearably hot ), wet your hands with water and shape out ladoos. Let the ladoos cool for 3 to 4 hours at room temperature, then they can be stored for about a month.


Note
As per the original recipe I should have added only 1/3 cup of jaggery for 1/3 cup of the seeds, but I found it difficult to shape the ladoos. Also I read that there is a special jaggery to make these ladoos and chikkis.
I just got 12 to 13 small ladoos, so we got it done within a week, but it should stay good for a month,
Figure out the heat at which you have to keep the pan for popping the seeds, I used a small omelette nonstick pan, so I reduced the heat completely while popping the seeds.
Wet your hands with water before shaping each ladoo.